USBelf Tutorial
1. Overview
USBelf includes a small hardware dongle and a suite of mobile and desktop applications. Together, they provide wireless DMX and RDM control as well as several other useful functions to the user's smartphone and Windows PC. In addition to its RDM capabilities, the product also serves as a mini DMX console. It allows recording of console output DMX signals and storing them in project files, which can be output to the lighting fixtures at any time. USBelf stands out for its simplicity, powerful features, and high reliability. We believe it will be your ideal choice.
2. Hardware
The USBelf is a compact and portable device that comes equipped with a 3-pin or 5-pin DMX interface, as well as a Type-C wired interface for power supply and communication with desktop applications. It also features an antenna that allows users to connect their mobile devices to the hotspot generated by the USBelf, enabling wireless control of connected lighting fixtures. The product includes a mode indicator light, WiFi channel indicator light, WiFi channel switching button on the back panel. The wireless mode indicator light can be used in conjunction with the wireless mode WiFi channel switch button. Each time the button is pressed, it switches to a different WiFi channel, and the indicator light changes color accordingly. This feature is particularly useful in environments with many WiFi signals, allowing users to select a relatively clean communication environment by switching WiFi channels.

3. Get the Apps
4. App on Windows
4.1 Installation Failed

Since our application relies on the 32-bit version of the Visual C++ runtime libraries, it is essential to install the Visual C++ Redistributable for 32-bit Windows systems.
4.2 How to connect the dongle to the computer app?
To connect our hardware device to the computer app, simply use the USBA to Type-C cable included in the package to connect it to your Windows computer. Then, open the app as shown in the figure below. Once the IP address matches that of your computer and the message 'connected successfully' is displayed, the connection has been established.

4.3 App Interface - RDM Tab

4.3.1 RDM Fixture Area

-
➤"Actual No." editing box :
Here, actual No. is an abbreviation for actual number. when we need to write DMX address codes for multiple RDM light fixtures that have been discovered, we naturally want to be able to do it all at once. Therefore, we need to set the actual number of each fixture before using the "One-click batch addressing" or "Visual addressing" tools to perform batch addressing.
In the image above, we can see two lighting fixtures that were found and displayed within the red border. Each fixture is labeled with a number at the beginning of its row: "1-1" and "2-2". The number before the "-" represents the order in which the fixtures were discovered, while the number after the "-" indicates their actual position within the lighting system. To facilitate batch DMX address coding later on, we can edit the fixture's actual position by entering a new number in the "Actual No." box.
For instance, if we want to modify the actual position of the first discovered fixture to 2 and the second discovered fixture to 1, we can select the first fixture and enter "2" in the "Actual No." editing box located above. Then, we can select the second fixture and enter "1" in the same editing box. Please refer to the image below:
-
➤"IP" dropdown menu :
The IP dropdown menu located in the upper left corner allows us to select the network that we want to use. Typically, laptops have two types of networks: wireless and wired.
On my computer, 192.168.1.18 is assigned to my wireless network, while 192.168.1.116 is assigned to my wired network. However, in most cases, we don't need to worry about this because the device communicates through a USB cable.
-
➤Fixtures list info :
 The image above shows six rows, each representing a lighting fixture that has been discovered. The
columns display various registered attributes, with a total of 11 attributes visible in the image.
The image above shows six rows, each representing a lighting fixture that has been discovered. The
columns display various registered attributes, with a total of 11 attributes visible in the image.
★ No.
The number before the "-" represents the order in which the fixtures were discovered.The number after the "-" indicates their actual position within the lighting system.
If you have any questions, you can also refer to the instructions for the "Actual No." editing box located above.★ UUID
"UUID" is the abbreviation of "Universally Unique Identifier". Each lamp has its own unique hexadecimal code.★ Addr
"Addr" is the abbreviation of "Address", representing the DMX address code of the fixture, which is usually an integer in the range of 0-255.★ Chan
"Chan" is the abbreviation of "channels", representing the number of channels of the fixture in the current personality mode.★ Device Lable
As the name suggests, "label" refers to the label or identifier of the luminaire. It is usually a phrase, word, or number used to identify and distinguish different fixtures.★ Manufacturer Lable
As the name suggests, "Manufacturer label" refers to the label or identifier of the manufacturer of this fixture.★ Device Mode
"Device Mode" is a description of the functions of the fixture. For example, if the fixture is a beam light, it is in "beam mode"; if it is a color-changing light, it is in "wash mode"; if it is a pattern light, it is in "spot mode", and so on.★ Personality Description
The options for describing "Personality" in DMX lighting include various preset modes that describe the functions and control methods of a fixture. Each Personality contains a set of channels that can control different attributes of the fixture, such as color, brightness, movement, etc. Examples of Personality options include "RGB", "CMY", "Color Wheel", and others, each corresponding to a different color control method. Users can select the appropriate Personality and set the value of each channel to control the effect of the fixture using a DMX controller.★ Software Version
"Software Version" refers to the specific version of software that is installed on the fixture★ Sensor Count
"Sensor Count" refers to the number of sensors installed on the fixture.
Sensors can help users better understand the working status and environmental conditions of the fixture, thereby improving the management and maintenance of the fixture. For example, when the sensor detects that the temperature of the fixture is too high, the controller can automatically reduce the brightness of the fixture or turn off the fixture to avoid overheating and damage. In addition, sensors can also be used to monitor the power status and service life of the fixture, reminding users to replace bulbs or repair fixtures in a timely manner. In summary, sensors are an important component of RDM fixtures that provide useful environmental and status information to help users better manage and maintain the fixture. -
➤"Speed" dropdown menu :

By clicking on the "Speed" dropdown menu in RDM fixtures, you can select the speed at which RDM data is sent. There are six options available: Speed0, Speed1, Speed2, Speed3, Speed4, and Speed5. Speed0 is the slowest option, while Speed6 is the fastest. When searching for fixtures, it is important to choose the appropriate speed to ensure a fast and accurate search. However, it should be noted that faster is not always better, and the most suitable, accurate, and stable option should be selected based on the actual situation.
-
➤"Search buttons :

When you click the 'Discover' button, the USBelf dongle sends RDM request messages to all RDM fixtures in the line, allowing you to discover all the RDM fixtures. When you click the 'Increase' button, the USBelf dongle first sends RDM request messages to the fixtures in the line that have not been discovered yet. This includes fixtures that failed to be discovered during previous searches or fixtures that were added later.
4.3.2 Function buttons

"Clear" button:
"When you press the 'Clear' button, it is used to remove all the discovered RDM fixtures. As a result, the left side's 'Fixtures list info' will be cleared."
"Identify" button:
Before pressing the "Identify" button, you must select a row of fixtures in the left-hand side "Fixtures list info". When you press this button, the selected row's "identify" text will start flashing, and the corresponding fixture(s) will also flash or light up.
"Up"&"Down" buttons:
These two buttons allow you to adjust the position of the fixtures in the left-hand side "Fixtures list info". Pressing the "Up" button moves the selected fixture(s) up one row, while pressing the "Down" button moves the selected fixture(s) down one row. With these buttons, you can meticulously arrange the fixtures to match the exact order in the lighting system, facilitating subsequent batch DMX encoding.
"ligh bulb" button:
This button can only be used when the selected fixtures are capable of being illuminated.
"Close" button:
The "Close" button is typically not required in normal circumstances. However, in rare cases where two fixtures share the same UUID, pressing this button becomes necessary to avoid program conflicts. As a result, it is seldom utilized in practice.
"Clear" button:
Please note that the "Clear" button, located at the bottom, can be clicked to clear the messages in the right-hand side Application Runtime Log Area.
4.3.3 Single Fixture RDM Setting Area

When we need to modify the DMX channel information of a specific fixture, it can be easily done through this section. First, we select a fixture from the 'Fixtures list info', and its details will be displayed here. The aspects we can to modify are: Axes, Personality, and DMX Address.
"Axes" checkboxs:
After the "Axes" option, there are three checkboxes. As the name suggests, "Axes" refers to the directions of the axes. In DMX lighting fixtures, the types that can adjust the direction of the axes are typically those that are rotatable or adjustable. These fixtures often include Moving Head Lights, Scanner Lights, and Rotating Ball Lights. By checking the checkboxes, we can achieve different axis direction reversals. Checking the first checkbox will reverse the X-axis direction, checking the second checkbox will reverse the Y-axis direction, and checking the third checkbox will simultaneously reverse both the X and Y axes. This way, you can freely adjust the axis direction of the fixtures according to your needs.
Personality:
After the "Personality" option, there is a dropdown menu. This menu displays the current channel mode of the selected fixture. If the fixture supports multiple channel modes, you can click on the menu to reveal a list of other available channel modes from which you can choose. By selecting different channel modes, you can change the control method and functionality of the fixture. Each channel mode defines a specific set of channel configurations that control various attributes and effects of the fixture. For example, a channel mode may include settings for color, brightness, movement, and other aspects. Using this dropdown menu, you can easily switch between different channel modes for the fixture, adapting to different lighting needs and effects.
DMX Address:
After the "DMX Address" option, there is a numeric input field and two buttons: a forward button and a backward button. The numeric input field displays the current DMX address of the selected fixture. You can adjust the value by clicking the forward or backward buttons, or directly inputting the desired value in the input field. Using this numeric input field and buttons, you can conveniently modify the DMX address of the fixture. The DMX address is used to identify the unique position of each fixture within the DMX control system. By adjusting the DMX address, you can ensure the correct correspondence between the fixture and the control system, enabling precise control and operation of the lights.
"Write" button:
It is important to remember to click the "Write" button after making any desired modifications to ensure that the changes are properly applied and stored in the fixture's memory.
4.3.4 RDM Fixture Status Area

4.3.5 Batch RDM Setting Area
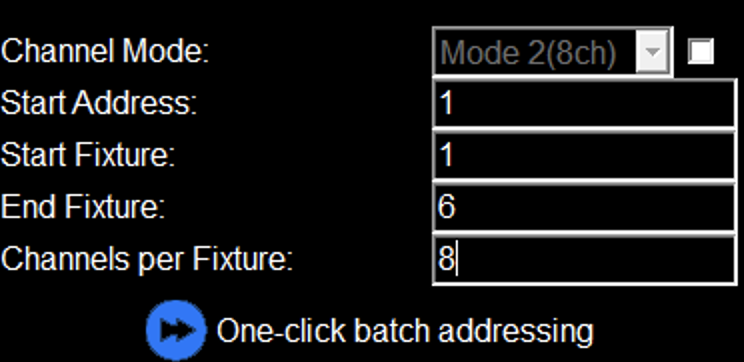
One-Click batch addressing
-
➤Channel Mode :
There is a dropdown menu that allows me to select the Personality for the fixtures that require batch addressing. Please note that the configuration will only take effect after checking the checkboxes. -
➤Start Address :
"Start Address" refers to the address value of the first fixture in the actual lighting system. -
➤Start fixture :
"Start Fixture" refers to the number of the first fixture in the actual lighting system. -
➤End Fixture :
"End Fixture" refers to the number of the last fixture in the actual lighting system. -
➤Channels per Fixture :
"Channels per Fixture" refers to the number of channels that each fixture occupies in the actual lighting system. -
➤One-Click batch addressing :
By clicking the "One-Click batch addressing" button, the system automatically calculates the DMX addresses and selects the specified personality for each fixture, and writes them into the lights. This eliminates the need for manually setting the address code and personality for each individual fixture, allowing you to complete the entire process with just one click.
Visual addressing
 click this Visual addressing button

-
➤Fixture List :
This section showcases all the RDM fixtures that have been discovered. Each row represents an individual fixture, with the first column labeled "No." indicating the fixture's serial number. The second column labeled "Addr" denotes the DMX address code of the fixture, while the third column labeled "Ch" signifies the Personality associated with the fixture. -
➤Visual Enconding Panel :
The Visual Encoding Panel consists of 512 small squares, with 32 squares horizontally and 16 squares vertically, totaling 512 squares. Each square represents an address code. In this DMX universe, there are 6 fixtures, with each fixture occupying 4 channels. You can see 6 colored squares representing these fixtures. The first square of each fixture is blue, indicating the address code of that fixture in this DMX universe. When we click on a fixture in the "Fixtures list" on the right side or directly click on the fixture displayed as a square, it sends an "identify" command to that fixture. As a result, the squares representing the identified fixture on the panel, except for the blue square, will turn purple. You can simply drag and drop these small squares to the appropriate positions and click the "Write" button to write the new address code into the fixtures.
note:When you click and select a fixture, the bottom right corner displays the fixture's address code in real-time.
-
➤Mini DMX Console :
The "Mini DMX Console" allows us to send simple DMX signals to the fixtures for basic testing purposes.
note:When you click and select a fixture, our "Mini DMX Console" automatically switches to the position where you can control the address code of that specific fixture. This saves you the trouble of manually searching for its location.
-
➤Function Buttons :

"Cancel Identify" button:
Before using the Mini DMX Console, it is necessary to click the "Cancel Identify" button to cancel any previous "identify" commands sent to the fixture. Otherwise, the fixtures will not be able to receive the DMX signals sent by the DMX console.
"Write" button:
After you have dragged all the fixtures to their desired positions, simply click the "Write" button, and the software will automatically write the DMX address codes to all the fixtures.
"Save List" button:
This is a truly groundbreaking feature. When you click the "Save list" button, the software allows you to save your current encoding information to a local file. If you need to use it again in the future, simply click the "Load List" button to import the previously saved file and effortlessly restore your previous encoding settings.

4.4 App Interface -Recorder Tab

When you click on the "Recorder" tab in the software, you can utilize the recording functionality. Within this feature, you have the option to select the desired Art-Net universe to record (ranging from 0 to 15). Once you have chosen the target universe, simply click the "Record" button, and the program will immediately commence real-time recording of the Art-Net signals transmitted within the local network. The recorded data will be saved as DMX files with the ".dmx" extension and displayed in the "Recorder Files" section. Upon completion of the saving process, you can play the recorded file by clicking the "Play" button. Through this process, you can conveniently record Art-Net data and output DMX signals.We use a computer in the local network to send Art-Net signals to our USBelf using the "QLC+" app on the computer. Please note that the universe for sending and recording must be the same. In this case, we are using universe 3.
4.5 App Interface -DMX Tab

The interface of the DMX Tab provides a straightforward DMX console, equipped with 512 faders capable of outputting 512 DMX channels. Furthermore, the console allows for the creation and saving of scenes, as well as customization of the fade time and hold time for each scene.